
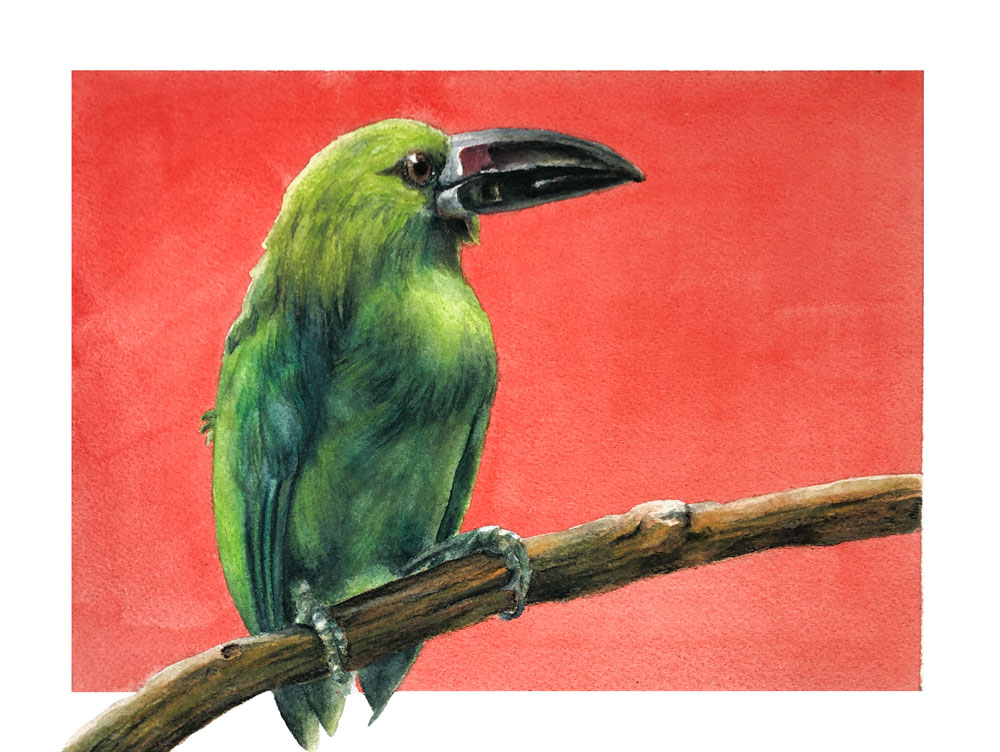
Green Bird with Watercolor Pencils

Lessons
About This Lesson Series...
The Green Bird with Watercolor Pencils lesson series is an engaging, step-by-step exploration of using watercolor pencils to create a vivid and expressive image of a green bird set against a rich red background. Throughout this series of lessons, you’ll learn how to combine the precision of colored pencil drawing with the painterly effects of watercolor, taking advantage of the unique qualities of this versatile medium. From initial observation to refined detail work, the lessons guide you through a complete creative process that builds confidence, control, and artistic understanding.
Developing Observational Skills
The series begins by emphasizing careful observation of the subject. Before any color is applied, students learn how to study the bird’s proportions, feather structure, posture, and distinctive features. Observation is a foundational skill that enhances accuracy and helps you translate what you see into a compelling and convincing drawing. By identifying major shapes and value relationships at the outset, you establish a roadmap that supports all stages of the image development.
Creating a Strong Initial Sketch
Once observation is established, the next step in the series is creating a structured pencil sketch. Using light and controlled lines, you’ll map out the bird’s shape and placement on the paper. This foundational drawing ensures that proportions are accurate and provides a framework for all watercolor pencil applications. This early planning stage also helps establish the composition’s balance, ensuring that the bird interacts harmoniously with the red background space.
Layering Watercolor Pencil Color
With the sketch in place, the lesson series transitions into layering color with watercolor pencils. This medium shines because it allows you to combine dry pencil control with the fluidity of watercolor washes. Initially, lighter hues are laid down to establish the base green tones of the bird’s feathers and the bold red background. Students learn how to build color intensity gradually, using both dry strokes and water activation to develop smooth transitions and vibrant hues.
Using Water for Painterly Effects
A defining aspect of the series is learning how to activate watercolor pencil marks with water. You’ll discover how a damp brush can transform dry pigments into soft, painterly washes, allowing colors to blend and flow naturally. This technique is especially helpful for suggesting the softness of feathers and creating a unified red background that supports the visual impact of the green bird. The instructor also demonstrates how to control water and pigment so that key details remain sharp.
Refining Details and Texture
As your painting progresses, the lesson series moves into refining the bird’s features and developing texture. Students learn how to add subtle feather patterns, enhance the bird’s eye and beak, and introduce nuanced value changes that bring depth and dimension to the image. The background is also refined to maintain richness without distracting from the subject, creating a striking visual contrast between red and green.
Balancing Light and Shadow
Throughout the series, careful attention is given to light and shadow. You’ll learn how to define the bird’s volume by observing how light falls across forms and how to use watercolor pencil techniques to model form. Students are encouraged to think in terms of value as well as color, ensuring that the bird feels three-dimensional and grounded within the composition.
Bringing It All Together
By the end of the Green Bird with Watercolor Pencils series, you’ll have completed a dynamic and expressive image that showcases both technical skill and artistic expression. This series not only teaches practical techniques for watercolor pencil work but also fosters a deeper understanding of observation, layering, texture, and color harmony. Whether you’re a beginning artist or looking to expand your skills, these lessons offer a rich and rewarding creative experience.
Resources for this Lesson...
Distributing any content downloaded from this site is strictly prohibited and against the terms and conditions of use.
References
Here's what you'll need...
- Watercolor Paints
- Assorted Nylon Brushes
- Watercolor Pencils
- Masking Tape
- Masking Fluid
- Watercolor Paper

Founder of The Virtual Instructor, artist and teacher. Matt makes learning art easy to understand and enjoyable.
Hi Matt and Ashley,
I am a new member and really enjoy watching your videos and techniques. My confidence and artwork are improving daily! “Dian” sent in a challenge that I think might be helpful to your newer members. I think it actually would help to have you and Ashley create the same artwork. One of you using the cheapest quality and one of you using professional grade products. My own frustration starting out was watching You Tube videos and doing everything the artist was doing, and the products I was using just would NOT produce the same effect as the professional grade paints. I was also using inferior paper and brushes. I think this would be a great video to produce. Certainly not to be used as a sales pitch for any particular brand or item, just to prove that quality DOES matter. Thank you for all you do. I wish you and Ashley a very Happy New Year!
Hi Mary,
That’s definitely something to consider. People do believe that the quality of the materials don’t matter much, but they really do.
WHAT SIZE IS YOUR IMAGE GOING TO BE
As a new subscriber these two episodes are my first Live Lesson. So far this is working very well for me as a way of learning, and I think I like it even better than the prepared lessons. For one thing, it gives insight into how long it really takes to complete a work. I also like the ongoing dialog between two artists, which keeps things moving along, adds interest, provides different perspectives on how to do a particular thing, and brings up little side facts that are useful and fun to know. Just a bit of trivia from my high school drafting class: we were taught to call those things “scales,” not “rulers,” and we would be in serious trouble if we were caught using one as a straightedge to draw lines! (That’s what T-squares and triangles were for.) 😉 I suspect that is an engineer’s scale as someone said; I know there are also draftsman’s scales and architect’s scales, and probably others. Looking forward to next week.
Hey, Matt, I am a new member of your website I just had a few questions that instead of the watercolour pencils which you are using can I use Derwent academy watercolour pencils and for the paper can I use Brustro watercolour paper and if I don’t have a masking fluid what can I use instead of that and Happy New Year.
Hi Deepak,
Yes, you can use any brand or surface that you wish. As far as a substitute for masking fluid – I’m not sure. Ashley mentioned that he has used rubber cement in the past. I don’t have any experience with this but you could give it a shot. You may want to test first though.
Hi Matt. It seems you can really read my mind, because I was going to propose you a live lesson using watercolour pencils, and… here it is!
But… You have done it again, because I have received a gift for Christmas, a set of watercolour markers, and I have just seen a youtube video using Watercolour markers!!!
Hahaha, how do you that? Are you a fortune teller??
Matt,you are not crazy. I remember those books that you are referring to.
I don’t have an ipad and don’t plan on getting one but I could follow along in Photoshop I think!
Just a quick comment about microwaving pencils. When you try to fix your pencils this way it is very dangerous. The fumes from this process exactly releases cyanide poison. The poison is heavy and quickly drops to the ground. The amount released is small, but if you make a practice of doing this, it can build up in your system. If you don’t wash the floor immediately it will remain on the floor. Over time it will dissipate, but it would be dangerous to young children crawling or family pets who lick the floor. It also releases other toxins which are dangerous. Inside the cyanide is in a enclosed place and you could actually pass out. Elsie
I enjoy following along with your live lessons and getting sketchy…the day after or so, because of the time difference, i spray then iron the back of cockled watercolour paper
I’m all caught up. Ready for this week!
Discovering The Virtual Instructor on line is most serendipitous. I have been stabbing around in the dark with watercolor pencils. I’ve watched 3 lessons now and I will go back to get caught up before I go on to lesson 4. I love the live lessons and the conversation with Ashley. I feel like I have a front seat in art school. I am an older person who has always wanted to try to draw and paint. The lesson format is a real “ can do” way of teaching because I can see and learn by mimicking you as well as absorbing information. THANKS, Judith
Awesome! Thanks Judith!
Have enjoyed this so much – the running dialogue, making up new, better names for the pencils, the ruler and math talk with Ashley on the number 2 lesson, made me laugh out loud. (I’m a math atheist.) I haven’t used watercolor pencils yet, but you have given me a reason to try them. I have watched every stroke of your brush with pleasure.
Thanks so much Julia!
Is there a significant difference between standard watercolor pencils and intense pencils?
Hi Diane,
They may look similar on the surface and behave in a similar way, but according to the manufacturer, they are different. Inktense pencils are said to be ink, while watercolor pencils are watercolor. Inktense pencils are more intense in color (as the name implies) and are less forgiving (harder to lift and remove). They are very similar though and one could be substituted for the other.
Correction – Inktense pencils
I really enjoyed the show. You and Ashley are like family friends here. The moon pie and RC cola thing were … different… though here in the real western NC (west of Asheville in other words) we don’t have the moon pies. In fairness, I did travel pre-covid to Chattanooga and found a store that claims to be the home and origin of Moon Pies. If you folks ever travel to Andrews area, let us know. Donna and I could set up a nice lunch maybe in the spring or summer.
I have some Derwent water color pencils that Ive had for literally years. I only really played around with them. Partly because I didn’t really know how to use them. I have been enjoying this lesson and finally getting some direction. I like the medium a lot. wish there was more lessons with them that I could do. I’ll have to look around you site for more.
I joined The Virtual Instructor almost a year ago and I have learned so much. I have done some of your lessons that I thought I would never be able to do, or even think of trying, but thanks to you and your step by step instructions I have had a measure of success and pleasure in what I have tried. Being retired it gives me something to keep me busy. >smiles<
I enjoy watching you and Ashley. Very inspiring.
Hi Matt and Ashley, I always watch the recorded version of these live lessons and you keep me company at breakfast and while having lunch..
I feel like I am learning a lot by simply watching what you do . After watching this lesson on watercolour pencils I can’t wait to try them. Question: would it be possible to use watercolour pencils as an under painting and then complete the drawing with colored pencils ? Kind of what Matt did with the frog using alcohol markers as an under painting.
Thanks again for what you do, you both are great.
Ciao.
Simona
Hi Simona,
Absolutely! That will definitely work!
Thank you Matt. Hope I can submit a work soon.
Have a good day.Ciao.
Simona
Hello Matt and Ashley
Loved this lesson! I decided to wait until the end of the project to create the red background. I chose to use Cray-pas oil pastel for the red color and blended it into the tooth of the paper with a blending stump. The vivid red that resulted really allowed the painting to pop off the paper. Thanks for the inspiration! You are a fine art instructor and a very talented artist and it is my pleasure to be one of your on-line students!
Dan
Once you have activated the color and it is darker than you want it, is it too late to recover the lighter color without losing too much paper tooth?
Watercolor pencil seems harder than Watercolor. I ended up using the Watercolor more. I definitely found myself coloring, which means I pressed too hard. Had no control and added many layers for the color to be somewhat believable. Too much water used so my paper almost went thru in some areas. I kinda like the result so there is that. I got done at lesson 3 so maybe I was in a hurry. I tend to get carried away.