
Ostrich with Charcoal

About This Lesson Series...
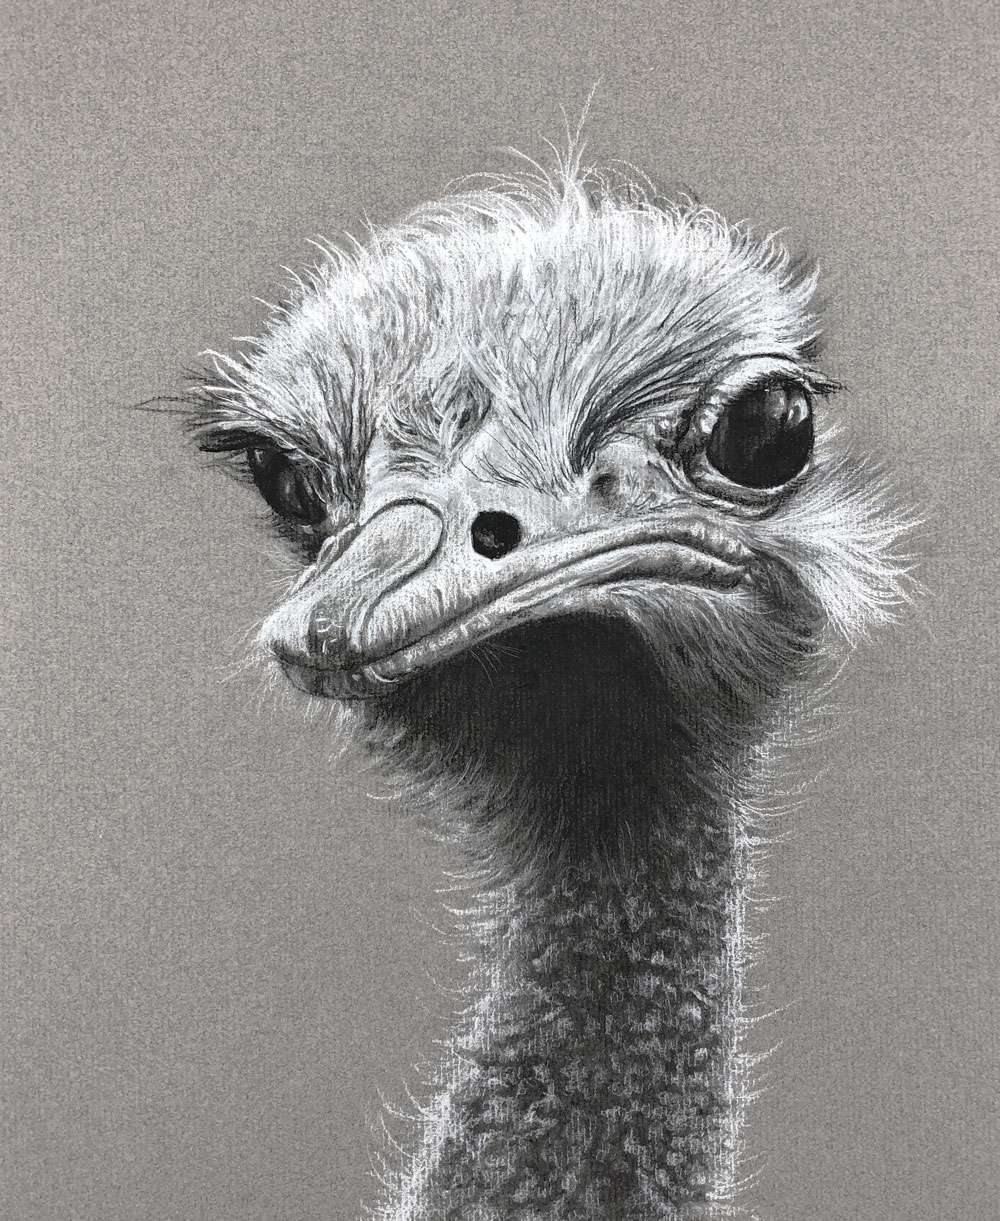
The Ostrich with Charcoal lesson series is a comprehensive and engaging study in realistic charcoal drawing that guides students through the creation of a striking portrait of an ostrich on gray toned paper. Using a combination of traditional charcoal and white charcoal, this series demonstrates how to capture the unique form, texture, and expressive character of this iconic bird. Across multiple lessons, you’ll learn how to observe carefully, build values, and create contrast to achieve a drawing that feels both dynamic and lifelike.
Observation and Seeing Light
The series begins with an emphasis on seeing — not just copying — what you observe. Learning to interpret the way light falls across the ostrich’s features and feathers is essential for a successful drawing. Students are encouraged to study values, forms, and the relationships between light, midtone, and shadow. This foundation in careful observation prepares you to build a drawing that feels grounded in reality rather than guessed or assumed.
Setting Up the Composition
Once observation skills are underway, the next step is establishing the composition on gray toned paper. A light sketch using soft charcoal maps out the general shapes of the ostrich’s head, neck, and body. Particular attention is paid to proportion and placement — ensuring that the long neck, inquisitive eyes, and unique beak are all positioned accurately before deeper value work begins. Thoughtful composition helps maintain balance and visual interest throughout the drawing process.
Building Dark Values with Charcoal
With the basic outline in place, students move into building rich dark values using vine and compressed charcoal. This lesson focuses on establishing the darkest areas of the drawing — deep shadows beneath feathers, around the eye socket, and within the folds of skin and plumage. By layering charcoal in graduated values, you begin to convey the three-dimensional volume of the bird. The instructor also demonstrates how to vary pencil grades and pressure to achieve subtle yet convincing transitions between dark and midtone areas.
Introducing White Charcoal
A defining feature of this series is the use of white charcoal to develop highlights and refine form. Because the drawing surface is gray paper, white charcoal stands out with clarity and luminosity, allowing you to push light values without losing contrast. This technique helps bring forward key elements such as reflections in the eye, feather highlights, and textured areas of the beak. Learning how to balance dark and light values is central to achieving dimensionality in the finished drawing.
Developing Texture and Detail
As the drawing progresses, attention turns toward capturing the textures that make the ostrich unique. You’ll learn how to suggest soft feathers, rough skin, and subtle planes using varied charcoal techniques — from delicate strokes to expressive shading. The instructor demonstrates how to refine edges, control blending with stumps or brushes, and adjust value relationships so that the ostrich feels tactile and present on the paper.
Final Refinement and Cohesion
In the final stages of the series, students focus on unifying values and refining details for maximum impact. Emphasis is given to balancing contrast, deepening shadows where needed, and sharpening highlights to draw the viewer’s eye. By carefully evaluating the drawing as a whole, you’ll make final adjustments that harmonize the composition and bring emotional life to the artwork. By the end of the Ostrich with Charcoal series, you’ll have a fully resolved charcoal portrait and a deeper understanding of how to handle both black and white charcoal with confidence and expressive control.
Here's what you'll need...
- Canson Ingres Toned Paper
- Charcoal Pencils (White and Black)
- Compressed Charcoal (White and Black)
- Vine Charcoal
- Blending Tools
- Kneaded Eraser
- Ruler or Meter Stick

Founder of The Virtual Instructor, artist and teacher. Matt makes learning art easy to understand and enjoyable.
I was just about to start to have a look at a charcoal live lesson, as I’ve not done one yet,I know I’ve been around a while but charcoal & pastels I’ve not attempted, plus I’m in the middle of a few projects, another dog portrait for a friend, it’s all practice.
I’m doing a while charcoal piece as well cos I happen to like them. I probably can’t post it or up on forum because it’s a star wars character, one of my favourites.
I remember I couldn’t send in my Spiderman cos of copyright.
I might even try and get to the 2nd live one 😁
I have a week to catch up lol, I would love to be there on the night.
I think it worked out at midnight in UK but now I’m usually up 😁
Hey Matt for lesson 2 what time do you stream in the US
I’m in UK
Cheers 😁
Hi Christine,
Currently, the live broadcast air on Wednesdays at 8:00 EDT. There is a countdown on the Live Lessons page to help you figure out what time this will be for your time zone.
Cheers Matt 😁
I went and forgot again !! This brain fog memory is terrible but I am going to do this ostrich, it’s a great photo. I’ll post it on forums as lessons I did with you.
One day I might be there on the night, in the year 2050 lol 😜
I absolutely LOVE this! Thanks Matt 😀
I heard Colin Bradley pronounce the Ingres paper un-gray. He is a Youtube artist from the UK.
Hi Kathy,
This is what I’m going on…https://www.youtube.com/watch?v=ea_v8kMuL5Y
I hear him as pronouncing it as “on-gray.” In the ear of the beholder!!
Cheers Matt 😁
Hi Matt, I would like to know the softness of the vine charcoal and hardness of the compressed charcoal that you used in this lesson.Thank you!
Hi Chinyi,
I wish I could tell you. The pencils have compressed charcoal so they are much darker obviously. When using charcoal, I don’t really think too much over the grade of the charcoal. If my marks are too dark, I can lift the material with a kneaded eraser or blend to make lighter.
That was so much fun!!! I’m a newbie, and I’m impressed with your teaching skills, my ostrich looks like an ostrich! Thank you!
Maybe a bit off topic, but in the beginning of this lesson you said that you can also use watercolor paper, but you’ve never saw gray watercolor paper. I have a block of paper, it’s gray. It’s PaintOn from Clairfontaine. Officially it’s mix media paper, but it can handle paint. I haven’t tried watercolor or inkwash on it, but I want to try it to see how it can handle water. And I have actual black watercolor paper too. Anyway, I love this charcoal lesson, I’m quite new to the medium and today I bought a charcoal pencil. Can’t wait to start using it.
Wow! My drawing turns out to look awesome! I didn’t even know that I would be able to create something like this. Thank you for the tutorial. I had so much fun drawing this ostrich!
Matt, am attempting to view this live lesson. It only buffers and will not load. Others worked just fine on my iPad Pro. Can you detect any sort of problem on your end. I have refreshed the site, logged out, and restarted the iPad on my end which exhausts my techie skill set. I would appreciate any advice or help you may have to offer. Many thanks, Fred Tinsley
Matt, never mind. Loaded finally and working fine.
The ostrich looks “like a Scottish elder rebuking sin from the pulpit.” ~ P.G. Wodehouse