
Portrait Drawing with Charcoal

Lessons
About This Lesson Series...
The Portrait Drawing with Charcoal lesson series is a comprehensive and inspiring study designed to help artists develop confidence and skill in rendering human likeness using traditional charcoal techniques. In this series, students create a detailed portrait of a young girl using both white and black charcoal on gray toned paper. By combining additive and subtractive methods — building darks with black charcoal and pulling light values forward with white charcoal — this series teaches how to portray depth, structure, and emotion with striking clarity.
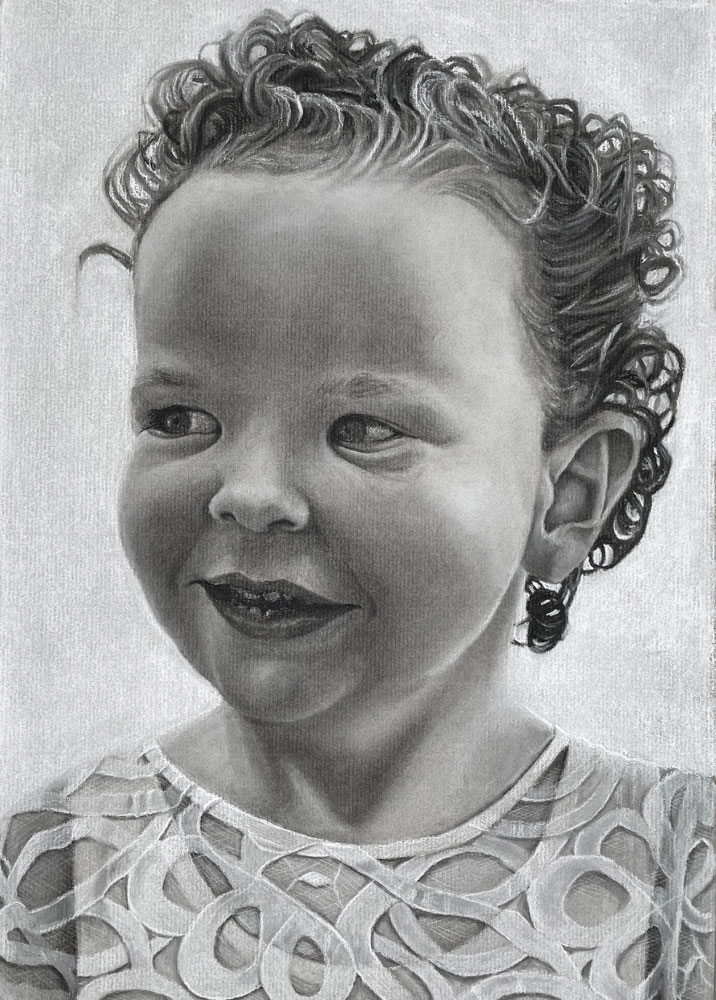
Lesson 1: Materials, Toning, and Planning
The series begins with an introduction to essential materials and surface preparation. Students learn about the characteristics of white and black charcoal and why toned paper provides an ideal ground for portrait drawing. Gray paper allows both dark and light values to coexist naturally, helping the portrait feel balanced and lively. Planning includes understanding proportions and placing the head and facial features accurately before any detailed work begins.
Lesson 2: Establishing the Drawing
With the surface prepared, the next step is establishing the initial drawing with light black charcoal. This lesson focuses on accurate observation and measurement, transferring the subject’s proportions to paper with confidence. Students learn how to simplify complex forms into basic shapes, ensuring that the position and scale of features like the eyes, nose, and mouth are correct. A solid foundation at this stage helps prevent structural errors later on.
Lesson 3: Blocking in Dark Values
Once the basic drawing is in place, students begin building darker values using compressed black charcoal. This lesson emphasizes how shadows define form and how to develop a full range of mid-to-dark tones. Attention is given to observing subtle shifts in value, such as the nuanced shadows around the eye sockets, cheek planes, and jawline. Students learn how to layer charcoal to build depth while maintaining a cohesive tonal structure.
Lesson 4: Introducing White Charcoal
The introduction of white charcoal marks a shift toward pulling light values forward. On gray toned paper, white charcoal creates highlights that feel luminous and natural. This lesson demonstrates how to use white charcoal to refine the bridge of the nose, brow ridge, cheek highlights, and lips. Students learn how light interacts with planes of the face, and how to enhance those interactions to create dimensionality.
Lesson 5: Refining Features and Expression
As the portrait develops, attention turns to refining the likeness and expression of the young girl. This stage focuses on subtle adjustments, enhancing contrast where necessary, and softening transitions for a more lifelike appearance. Techniques such as blending with stumps or brushes help create smooth value changes, while careful use of charcoal edges defines sharper areas like the eyes, lips, and strands of hair.
Lesson 6: Final Adjustments and Unifying the Portrait
In the final lesson, students bring all elements together by balancing values, deepening shadows, and strengthening highlights for maximum impact. You’ll learn how to evaluate the portrait as a whole, making final refinements that ensure harmony and cohesion. By the end of the series, students will have a powerful, expressive portrait drawing that showcases their growth in charcoal technique and observational skill.
Resources for this Lesson...
Distributing any content downloaded from this site is strictly prohibited and against the terms and conditions of use.
References
Here's what you'll need...
- Toned Gray Paper (Ingres)
- Vine Charcoal
- Compressed Charcoal and Charcoal Pencils
- White Charcoal and White Charcoal Pencils
- Kneaded Eraser
- Blending Stumps or Tortillions
(Disclosure: Links to art materials are affiliate links which means we make a small commission if you purchase at no additional cost to you.)

Founder of The Virtual Instructor, artist and teacher. Matt makes learning art easy to understand and enjoyable.
Should the vine charcoal be extra soft, soft, medium or hard? Same question goes for the white charcoal. Sadly I can no longer be at the live lessons now that the semester started. I teach nights. 🙁 I’m trying to keep up with your lessons at a later time. Thanks.
Hi Kimberly,
There is actually very little deviation between the different grades of charcoal, but if you had to choose – I would go with medium.
Also, what brand is the gray-tone Ingres paper? I’m having a little hard time finding it.
Hi Kimberly,
It is made by Canson.
I’m caught up. Looking forward to tomorrow’s live lesson. Looks great Matt. Thank you!
Enjoying doing this one, though not live. Its great learning, and listening to the banter, looking forward to getting sketchy too. To the person who asked about zest-it, i use it a lot with pastelmat, the secret is only putting a small amount on otherwise it does bleed. I tend to keep away from the edges, then push into edges with a clean brush.
I think I ve guessed the paper chioce for your coloured pencil lesson .
Love the “discussion” about the 4 hour circle! Made my day!
Awesome
What time are your live lessons in Minnesota
HI Tanya,
Live Lessons are broadcast each week at 8:00 PM EDT on Wednesday. There is a countdown timer on the Live Lesson page.