
Trumpet with Charcoal

Lessons
About This Lesson Series...
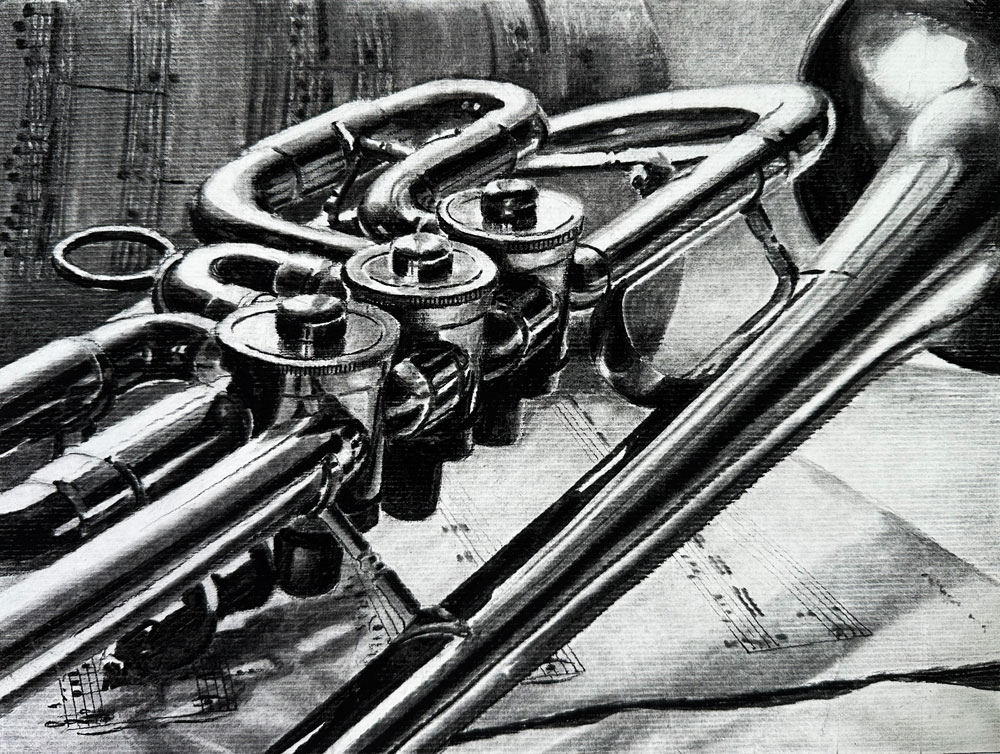
In this live lesson series, we take an in-depth look at drawing a highly detailed trumpet using charcoal on white paper. This subject provides a unique and rewarding challenge, combining precise structure with reflective metallic surfaces. Throughout the series, we focus on building accuracy, developing strong value relationships, and capturing the intricate details that make the trumpet both visually complex and engaging to draw.
Establishing Structure and Proportion
We begin by carefully mapping out the overall shape of the trumpet using light, controlled marks. Because of the instrument’s mechanical nature, accuracy is essential. Straight lines, curves, and cylindrical forms must align correctly to create a believable structure. In this stage, we simplify the trumpet into basic shapes and forms, allowing us to focus on proportion and placement before committing to darker values. Careful observation and comparison techniques are emphasized to ensure that each section of the instrument relates properly to the others.
Understanding Charcoal on White Paper
Charcoal is an ideal medium for this subject due to its ability to produce a full range of values, from deep blacks to soft grays. Working on white paper allows us to take advantage of the surface as the lightest value, while building darker tones gradually. In this lesson, we explore how to control charcoal application, blend transitions smoothly, and maintain clean highlights that are essential for depicting reflective surfaces.
Developing Value and Form
As the drawing progresses, we focus on developing the full range of values needed to create a convincing illusion of form. The trumpet’s reflective metal surface requires careful observation of light patterns, including bright highlights, midtones, and deep shadows. By layering charcoal and adjusting pressure, we create smooth gradations that describe the cylindrical and curved forms throughout the instrument. Emphasis is placed on seeing shapes of value rather than outlining details, allowing the drawing to feel more natural and dimensional.
Capturing Detail and Texture
Once the foundational values are established, we begin refining the smaller details that give the trumpet its character. Valves, tubing, and subtle surface variations are developed with controlled marks and careful attention to edges. We discuss when to sharpen details and when to soften them, ensuring that the drawing remains balanced and visually cohesive. Even though the surface of the trumpet is smooth, slight variations in value and edge quality help suggest realism.
Final Refinement and Contrast
In the final stages of the series, we focus on strengthening contrast and enhancing the overall impact of the drawing. Highlights are preserved or lifted where necessary, while darker values are deepened to increase depth and clarity. These finishing touches bring the drawing to life, emphasizing the reflective quality of the metal and the precision of the instrument’s design.
By the end of this live lesson series, you will have completed a detailed charcoal drawing of a trumpet and gained valuable experience working with complex forms, reflective surfaces, and a full range of values. These skills will translate to a wide variety of drawing subjects, helping you create more accurate, dynamic, and realistic artwork.
Specific Lessons
Lesson 1 (1:08:44)
In lesson one, we discuss the materials and begin drawing the contours of the trumpet with charcoal pencil using a grid.
Lesson 2 (1:09:03)
In lesson two, we complete the contour line drawing using a grid.
Lesson 3 (1:10:48)
In lesson three, we begin developing the values and shading on the trumpet.
Lesson 4 (1:12:48)
In lesson four, we develop the values and reflections on the right side of the drawing.
Lesson 5 (1:06:04)
In lesson five, we continue working on the body of the trumpet, developing the values on the valves.
Lesson 6 (1:06:42)
In lesson six, we continue working on the body of the trumpet, developing the values on the tubes at the top of the picture plane.
Lesson 7 (1:08:44)
In lesson seven, we finish applying the base vine charcoal applications to the entire picture plane.
Lesson 8 (1:09:55)
In lesson eight, we begin adding musical notes to the sheet music behind the trumpet.
Lesson 9 (1:09:54)
In lesson nine, we continue adding musical notes to the sheet music behind the trumpet.
Lesson 10 (1:11:55)
In lesson ten, we complete the drawing and remove the tape!
Resources for this Lesson...
Distributing any content downloaded from this site is strictly prohibited and against the terms and conditions of use.
References
Here's what you'll need...
(Disclosure: Links to art materials are affiliate links which means we make a small commission if you purchase at no additional cost to you.)

Expert teacher and visual artist. Ashley is encouraging and makes creating art easy to understand.
Hello!
Re Reference Grid Photo for Lesson 2. Ashley has said he might break down a small portion of the grid into smaller bits.
I wonder if a part of the reference grid photo could be re-formatted into, say, 1/2″ squares. Just for the bit he thinks he might try?
Random question: if I am creating a soft pastel drawing with a blurry background can I use the regular soft pastel or do I have to use pan pastel?
Tysm 😀👍
Late response to Matt’s query re what “tools” we watch TVI on. I have you on my MacBook, with reference photo on iPad.
At night I can be caught watching ON MY PHONE! That screen image is 6″x3″. This channel is so soothing and uplifting – it beats the nightly news….
🙂 margaret