
Colored Pencils Plus: Markers and Colored Pencils

Course Curriculum
Lesson Description
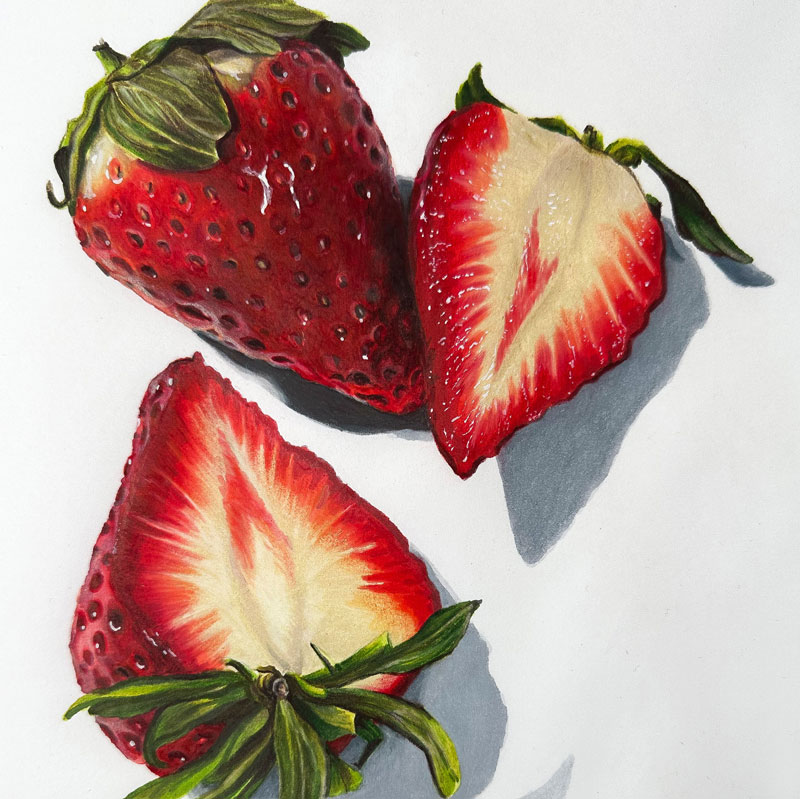
This module is an engaging mixed-media lesson that teaches artists how to combine alcohol-based markers and colored pencils to create a vibrant still life of strawberries. This module demonstrates how markers can be used as a strong underpainting to quickly establish color and value, while colored pencils are applied on top to refine details, enhance texture, and add depth. The result is a richly layered piece that captures both the bold color and delicate surface quality of strawberries.
Understanding the Mixed-Media Process
The lesson begins by explaining the rationale behind this mixed-media approach. Alcohol-based markers provide smooth, saturated color foundations that cover large areas evenly and dry quickly. Colored pencils, with their ability to layer and blend subtly, are used afterward to refine texture, introduce fine detail, and enhance value transitions. Students learn how to select complementary colors for both markers and pencils to create a unified and harmonious final piece.
Blocking in Color with Markers
Students begin the artwork by sketching a light outline of the strawberries and their arrangement. Once the composition is established, alcohol-based markers are used to block in the main colors and values. At this stage, attention is given to identifying light sources, shadows, and the varied tones that make each strawberry appear three-dimensional. Bold marker application quickly establishes a colorful underpainting that sets the stage for more refined work.
Preparing for Colored Pencils
After the marker layer is complete and fully dry, the class transitions to colored pencil application. Students learn how to work sensitively over the marker base without damaging the paper’s surface. This section of the lesson includes advice on layering pressure, choosing pencil colors that enrich rather than dull the marker tones, and using pencils to blend and soften edges where desired.
Adding Texture and Detail
With the foundation in place, students use colored pencils to build texture and detail in the strawberries. The lesson highlights techniques for suggesting seeds, surface variation, subtle highlights, and soft gradients of color. Colored pencils allow for gradual refinement, making it possible to enhance areas of contrast and emphasize the natural texture of each strawberry’s skin.
Refining Values and Enhancing Depth
As the drawing nears completion, focus shifts to unifying values, strengthening shadows, and enhancing highlights. Students learn how to adjust contrasts to improve depth and guide the viewer’s eye. By the end of this module, artists will have a polished still life of strawberries and a practical understanding of how to combine alcohol-based markers with colored pencils for vibrant, detailed artwork.
Specific Lessons
Lesson 1 - Materials and Sketch
In this lesson, we explore the materials and surface that will be used and create the sketch of the strawberries with a pencil.
Lesson 2 - Markers - Part 1
In this lesson, we begin applications of alcohol-based markers which will serve as an underpainting for colored pencil applications.
Lesson 3 - Markers - Part 2
In this lesson, we complete applications of alcohol-based markers and finish our underpainting.
Lesson 4 - Colored Pencils - Part 1
In this lesson, we begin with colored pencil applications, adding details to the starwberries.
Lesson 5 - Colored Pencils - Part 2
In this lesson, we complete the drawing and add highlights with white gouache.
Lesson Materials
- Marker Paper
- HB Graphite Pencil
- Prismacolor Premiere Colored Pencils
- Alcohol-based Markers
- White Gouache
(Links to materials are affiliate links which means we make a small commission if you purchase and no additional cost to you.)
Lesson Resources
References
Download eBook

Founder of The Virtual Instructor, artist and teacher. Matt makes learning art easy to understand and enjoyable.
can I use pit brush pens
Hello Matt, where are the affiliate links for materials discussed in your lessons?
Hello matt I’ve been trying to play your video courses and they keep saying “Sorry we’re having a little trouble” How do I fix this? Should I wait and come back after a few days? Thank you
Hi Yasmeen,
Our video hosting provider has informed us that they are currently having issues. This is temporary and should resolve soon.
Also I forgot to ask is there a cheaper alternative set that I can use? Those prisma color markers are way too expensive for me is there any other brand you can recommend that has a similar colour range? I have water-soluble tombow markers that I’m planning on using if that’s okay. I’ll try my best to match those exact reds
Hi Yasmeen,
I would try to find some alcohol-based markers (There are cheaper brands on Amazon). The water-based markers will not produce the same results.
Thank you so much! The video is working for me now and I can’t wait to try this it looks so real I love this! I’ve decided to get the Ohuhu Markers instead then so far those are at a good price for me and they have a good range from what I’ve seen
Based on my experience and reviews that I have read, the Ohuhu markers are essentially as good as the much more expensive markers. Ohuhu also offers refillable markers.
I used a mix of off brand markers , promarkers and copic markers to get a full range of colours.
Thank you Matt, I I have been following along and started to give myself a little bit too much artistic licence and lost some of the lighter areas of the strawberries by giving a far too smaller area to look effective. I continued on hoping I could resurrect it. It really bugged me so right at the last moment I decided to use the white gouache in a very thin layer to just remove a slight area of the red flesh of the strawberry. once it was dry the coloured pencils worked very nicely over the top and the result worked. It was a bit of a challenge not to become a painting and to keep it a lovely drawing. Thanks for the techniques of the layering as this has become a game changer for me. I am loving the humble coloured pencil again.
Thank you Matt for this lesson, I really enjoyed it and learned a lot. I was kind of disappointed in the markers I bought from Michael’s. They did not blend as well as yours seemed to do. And I had difficulty in layering the prisma colored pencils over the markers. I would appreciate any feed back.
Thanks, Dennis
Hi Dennis,
Check and make sure you are using alcohol-based markers. These markers blend and go on with a translucent application.
Hi Matt, do you have to use marker paper for markers or can markers be used on canson mi Tientes, Stonehenge or other colored pencil papers? Thanks