
Realistic Pencil Drawing: The Final Challenge

Course Curriculum
Lesson Description
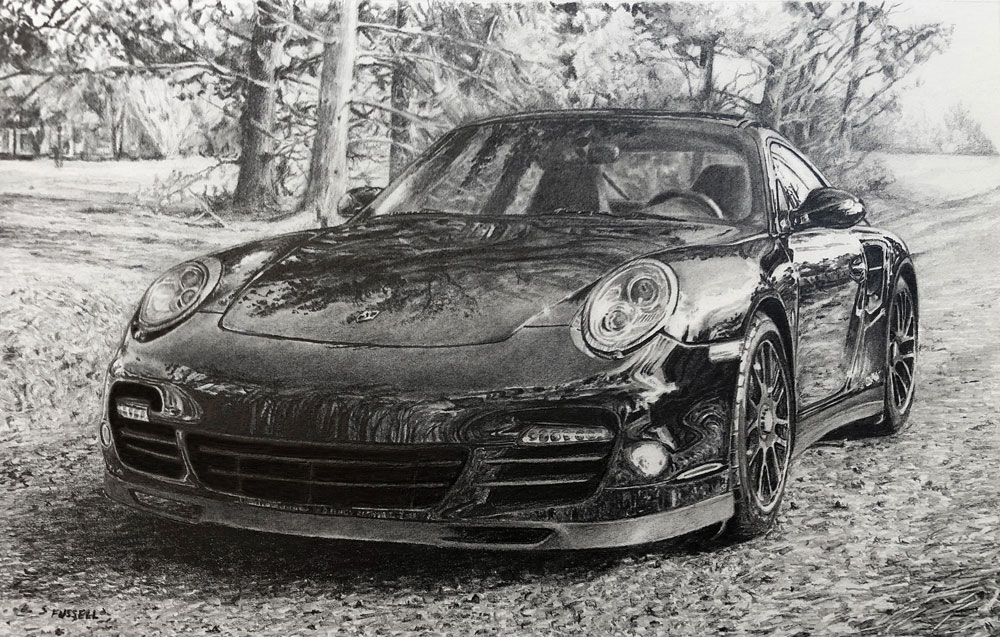
This module serves as the culminating lesson in the realistic pencil drawing series. In this class, students apply everything they have learned to create a highly realistic drawing of a sports car. This advanced project challenges observation, patience, and technical skill, bringing together proportion, value, texture, and detail into one comprehensive drawing experience.
Applying Foundational Drawing Skills
This module builds directly on the skills developed in earlier lessons, including sighting, value control, and careful observation. Students begin by establishing accurate proportions and perspective, ensuring that the sports car’s structure is believable and solid. The lesson reinforces the importance of planning and measurement before moving into detailed rendering.
Drawing Complex Forms and Perspective
Sports cars present unique challenges due to their complex shapes, reflective surfaces, and precise proportions. This class demonstrates how to break down these complicated forms into simpler shapes, making the drawing process manageable. You’ll learn how curves, angles, and perspective work together to create the illusion of speed, solidity, and realism.
Mastering Value and Contrast
A major focus of the lesson is developing strong value relationships. You’ll learn how to identify highlights, midtones, and deep shadows and apply them strategically to define the car’s form. High contrast areas are used to suggest reflective surfaces, while subtle transitions help maintain smooth, realistic contours.
Rendering Texture and Surface Quality
In addition to form and value, the module emphasizes rendering surface qualities such as polished metal, glass, rubber, and reflections. You’ll learn how to use graphite to suggest different materials without overworking the drawing. Careful control of edges and highlights helps distinguish each surface and enhances overall realism.
Refining Details and Achieving Realism
As the drawing nears completion, attention shifts to refining details and unifying the composition. The class demonstrates how to sharpen focal points, clean up edges, and adjust values for maximum impact. These final refinements elevate the drawing from a technical study to a polished, realistic artwork.
A Culminating Realistic Drawing Experience
By the end of this module, you’ll have completed a highly realistic sports car drawing that showcases your growth as an artist. This lesson serves as both a test of skill and a rewarding conclusion to the series, giving you the confidence to tackle complex, realistic subjects in your future drawing projects.
Specific Lessons
Lesson 1 - Materials and the Grid
In this lesson, we take a look at the materials used to complete the drawing. We set up our drawing surface with a grid and draw the contours.
Lesson 2 - Abstraction
In this lesson, we begin the process of developing the texture and value. We learn to look for the abstract shapes of value and include them in our drawing.
Lesson 3 - 77 Drawings
In this lesson, we continue working on the background and learn to approach our drawing one small square at a time.
Lesson 4 - Reflections
In this lesson, we work down into the body of the car and slowly develop the complex reflections.
Lesson 5 - Getting Grilled
In this lesson, we continue working down the body of the car and work our way to the grill where we find subtle transitions of value.
Lesson 6 - High Contrast
In this lesson, we address the front side panel of the car and develop the high contrasting reflections that face the light source.
Lesson 7 - Finishing Touches
In this lesson, we complete the drawing by addressing the wheels and tires, the rest of the body, and the surrounding textures.
Lesson Materials
- Stonehenge Warm White Drawing Paper
- Lead Holder
- Graphite Grades (2H, HB, 4B)
- Blending Stumps
- Precise Vinyl or Plastic Eraser (Tombow Mono)
- Ruler
- Electric Eraser (Optional)
Lesson Resources
References
Download eBook
Photo Reference
Gridded Photo Reference
Finished Drawing

Founder of The Virtual Instructor, artist and teacher. Matt makes learning art easy to understand and enjoyable.
Oh my gosh, i am SO excited to start this one! I have learned more from your site and tutorials than any other i have participated with, and the membership is worth every penny! This series is my personal favorite and sad to see its end, but what an image to end on 🤘
Awesome! Thanks Trever! This one took a while to produce. The drawing took around 25 hours and then the editing took 7 full work days. Glad it’s worth the wait!
Thank you for saying how long the drawing took. It really helps when evaluating progress (or lack thereof)!
This looks like a great challenge. Can you tell me the brand of the electric eraser?
Thanks!
Me again! I also wanted to ask if there is another type of paper that would be good for this project? I have lots of different type of paper and don’t want to by another just yet.
Thanks again!
Thank you for saying how long the drawing took. It really helps when evaluating progress (or lack thereof)!
Matt, I’m just learning to draw. I was amazed at how much tonal diversity you achieved using only three grades of graphite. Excellent job. Watching you draw, appreciating how long it took, certainly challenged and inspired me. One of the most helpful things I took from this was your workflow: work a while. Step away. Come back refreshed and above all…be patient. Thank you so much for this series and for your website.
Absolutely! Thanks Tom!
Hi Matt, this looks really good.
Over the last 6 months I’ve not being doing much drawing, my illness isn’t too good got diagnosed with another long-term condition which affects my lungs and I’m already asthmatic. So 3 long terms to deal with anyway I’m still here and I’ve stared to get back into drawing snd I have a file with the graphite course I want to do next. Ive only a couple modules in pen and ink, it should of been finished ages ago.
Anyway I’m back.
Its good advice isn’t it, its reminded me glad you said this in your comments cheers
wow what a drawing to finish on, really pushed me out of my comfort zone of soft feathers and fur. really enjoyed following along and learned alot along the way. Thank you, now to loosen up with a catch up on getty sketchey
Can you do a drawing of Luke Skywalker from Star Wars
bellisimo
hello
first i wanna say thank you very much for this wonderful course i defiantly had so many ahah moments and learned a lot from it, I drew the car along with you and it came out really good with few mistakes but I know what to look for next time, and you did make me feel better for taking too long to finish a drawing i thought i was slow and was gonna give up on drawing until i took this course . looking forward to join your channel soon and learn more from you
thank very much
Boy! You really know how to challenge the novice! I have learned an immense amount of insight and practical knowledge through your courses. So far, I am doing all the graphite courses because I so want to learn to draw. I’m amazed at my progress! But doing the grid work is surprisingly hard for me. IDK if it is a problem with my astigmatism (hard to focus sometimes) or the stress of trying to get things relatively accurate. It is kinda overwhelming. If anyone has any feedback or tips, I’d appreciate it. TY.
Just finished the session very challenging
Thank you Matt. I leanrt lot on this session. Grate course!
Another amazing course. Having completed the “25 Day to Better Drawings” and the “Guide to Graphite” this was the perfect class to put all the techniques into practice. Can’t decide what class to take next!
Yeah, I made it to the final challenge following this course step by step so far. Being happy with the result of the last module, I cannot wait to start the car.
This course is ery teaching,
Buddy
I wanted to know how do I submit my work?
Hi Sue,
You can submit original works for critique here…https://thevirtualinstructor.com/members/ask-your-question
Hello Matt, quick question about paper. I am drawing a realistic photo of where my son will be getting married this May. It is an outdoor scene looking out to the distance with the alter the centerpiece, vineyards, lots of background info to put down. I’m not sure which paper would be better for this type of drawing. I was leaning towards Stonehenge based on the final challenge. I’m going with a larger size, 18×24, only offered in white, no warm white. I know some of this is preference but I don’t have enough experience to know otherwise. Any feedback is appreciated. Love your site and YouTube videos too. It has changed my life with drawing and what I thought I couldn’t do, now can do….love it!! P.S. I did a runthrough of this drawing on a similar printers type paper, 90 lb, large sheets, to work out the kinks. Came out ok…will happily send the drawing in for critique.
Hi Rich,
Thanks for the comments! I really appreciate it! As far as the paper goes, it depends on how light you want the highlights to be. If you want full strength with the lightest lights, then white paper is great, Polar White is even better. Warm white paper dulls the highlights and gives the drawing an aged look (which may be what you want). Stonehenge paper is made by Legion, which sells their papers through resellers. They do sell all of these “whites” as larger sheets (30″ by 22″). This is how I buy the paper now – in these sizes. For the Warm White, I found this reseller…https://www.dickblick.com/items/legion-stonehenge-paper-22-x-30-warm-white-90-lb/. For the Polar White paper, you can buy large sheets here…https://www.dickblick.com/items/legion-stonehenge-paper-22-x-30-polar-white-90-lb/. I’ll be glad to take a look at your drawing, just submit it through the Member’s Minute system.